TerraformをDigital Oceanで試してみる3 - provisionerにchefを使う
Terraformのprovisionerとしてchefを使うにはChefサーバが必要になります。
Chefサーバの準備が面倒な場合は、Hosted Chefで代用できます。Hosted Chefの設定については前回の記事が参考にしてください。
Chef Clientのインストール
provisionerにChefを指定したときに、skip_installをtrueにしなければ(デフォルトではfalse)Chef Clientをインストールできますが、remote-execを利用してChef Clientをインストールします。
inlineに実行したいコマンドを指定するので、ここではOmnibus Installerを実行します。
remote-execではConnectionを指定してSSHで接続出来るようにします。
    provisioner "remote-exec" {
        inline = [
        "curl -L https://www.chef.io/chef/install.sh | sudo bash"
        ]

        connection {
            user = "root"
        type = "ssh"
            key_file = "${var.ssh_key_file}"
    }
    }
key_fileで指定する鍵ファイルはdecryptされている必要があります。decryptしていない場合は以下の様なエラーがでます。
digitalocean_droplet.node-1: Provisioning with 'remote-exec'...
digitalocean_droplet.node-1: Error: 1 error(s) occurred:

* Failed to read key '/Users/username/.ssh/id_rsa': password protected keys are
not supported. Please decrypt the key prior to use.
Error applying plan:

1 error(s) occurred:

* 1 error(s) occurred:

* 1 error(s) occurred:

* Failed to read key '/Users/username/.ssh/id_rsa': password protected keys are
not supported. Please decrypt the key prior to use.

Terraform does not automatically rollback in the face of errors.
Instead, your Terraform state file has been partially updated with
any resources that successfully completed. Please address the error
above and apply again to incrementally change your infrastructure.
その場合は以下のコマンドでdecryptします。
openssl rsa -in <Encrypted key filename> -out < desired output file name>
Chefの実行
provisionerとしてchefを利用します。
Chef Serverを使う必要が有るため事前にChef Serverを利用できるようにする必要があります。
ここでは、CookBookとしてgetting-startedを指定しています。
getting-startedを使う場合はattributesは利用しないので設定不要ですが、サンプルとして記述しています。
また、Terraform v0.5.2ではchef provisionerはterraform.tfvarsに定義した値を使えない※ようなので直接値を書きます。
※変数名が定義した文字列にならず、変数名のままchef-clientに渡っているようなエラーがでます。
    provisioner "chef"  {
        attributes {
            "key" = "value"
            "app" {
                "cluster1" {
                    "nodes" = ["webserver1", "webserver2"]
                }
            }
        }
        environment = "_default"
        run_list = ["getting-started"]
        node_name = "node-1"
        server_url = "https://api.opscode.com/organizations/"
        validation_client_name = "Organazation名-validator"
        validation_key_path = "./Organazation名-validator.pem"
        skip_install = true

        connection {
            user = "root"
            type = "ssh"
            key_file = "${var.ssh_key_file}"
        }
    }
注意すべき点としては、destroyしてもChef Server側に登録されたnode(node_name)は削除されないので別途削除する必要があります。
作成されたnodeを削除しないでterraform applyを再度実行した場合は、以下の様なエラーが表示されます。
ocean_droplet.node-1 (chef): Creating a new client identity for node-1 using the validator key.
digitalocean_droplet.node-1 (chef):
digitalocean_droplet.node-1 (chef): ================================================================================
digitalocean_droplet.node-1 (chef): Chef encountered an error attempting to create the client "node-1"
digitalocean_droplet.node-1 (chef): ================================================================================

digitalocean_droplet.node-1 (chef): Authorization Error:
digitalocean_droplet.node-1 (chef): --------------------
digitalocean_droplet.node-1 (chef): Your validation client is not authorized to create the client for this node (HTTP 403).
digitalocean_droplet.node-1 (chef):
digitalocean_droplet.node-1 (chef): Possible Causes:
digitalocean_droplet.node-1 (chef): ----------------
digitalocean_droplet.node-1 (chef): * There may already be a client named "node-1"
digitalocean_droplet.node-1 (chef): * Your validation client (Organization名-validator) may have misconfigured authorization permissions.
digitalocean_droplet.node-1 (chef):
digitalocean_droplet.node-1 (chef): [2015-06-13T07:26:44-04:00] FATAL: Stacktrace dumped to /var/chef/cache/chef-stacktrace.out
digitalocean_droplet.node-1 (chef): Chef Client failed. 0 resources updated in 3.789611695 seconds
digitalocean_droplet.node-1 (chef): [2015-06-13T07:26:44-04:00] ERROR: 403 "Forbidden"
digitalocean_droplet.node-1 (chef): [2015-06-13T07:26:44-04:00] FATAL: Chef::Exceptions::ChildConvergeError: Chef run process exited unsuccessfully (exit code 1)
digitalocean_droplet.node-1: Error: 1 error(s) occurred:

* Command "chef-client -j \"/etc/chef/first-boot.json\" -E \"_default\"" exited with non-zero exit status: 1
Error applying plan:

1 error(s) occurred:

* 1 error(s) occurred:

* 1 error(s) occurred:

* Command "chef-client -j \"/etc/chef/first-boot.json\" -E \"_default\"" exited with non-zero exit status: 1

Terraform does not automatically rollback in the face of errors.
Instead, your Terraform state file has been partially updated with
any resources that successfully completed. Please address the error
above and apply again to incrementally change your infrastructure.
do.tfファイル、variables.tf
最終的な do.tfは以下のようになります
provider "digitalocean" {
      token = "${var.digitalocean_token}"
}

resource "digitalocean_droplet" "node-1" {
     image = "ubuntu-14-04-x64"
     name = "node-1"
     region = "sgp1"
     size = "512mb"
     ssh_keys = [${var.ssh_key_id}]

    provisioner "remote-exec" {
        inline = [
        "curl -L https://www.chef.io/chef/install.sh | sudo bash"
        ]

        connection {
            user = "root"
            type = "ssh"
            key_file = "${var.ssh_key_file}"
        }
    }

    provisioner "chef"  {
        attributes {
            "key" = "value"
            "app" {
                "cluster1" {
                    "nodes" = ["webserver1", "webserver2"]
                }
            }
        }

        environment = "_default"
        run_list = ["getting-started"]
        node_name = "node-1"
        server_url = "https://api.opscode.com/organizations/"
        validation_client_name = "Organazation名-validator"
        validation_key_path = "./Organazation名-validator.pem"
        skip_install = true

        connection {
            user = "root"
            type = "ssh"
            key_file = "${var.ssh_key_file}"
        }
    }
}
variables.tfとterraform.tfvarsは前回から変更は無いです。
Hosted Chefを使ってみる
サーバがインターネットに接続可能でChefサーバを建てるまではないけど、少しChefサーバを使ってみたいというようなときにHosted Chefが便利なので使ってみました。
Chef 12のオープンソース版と25ノード制限について を見ると、5ノードまでは問題なく使えるようなのでちょっとした確認には使うことが出来ます。
アカウントが無い場合はStart your free trial of hosted Chef から作ることが出来ます。
以降はログインが完了している前提で記載しています。
HOSTED CHEFでの設定
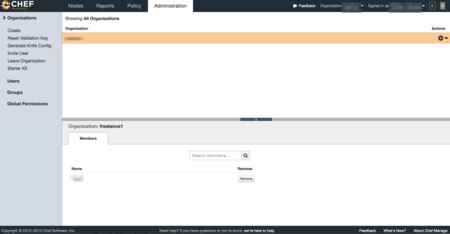
Administration -> Organazationを選択します。

knife.rbの作成
Generate Knife Configを選択すると、kinife.rbが ダウンロード出来ます。
validation_keyのダウンロード
Reset Validation Keyを選択すると、kinife.rbのvalidation_keyにOrganazation名書かれているpemファイル(Organazation名-validator.pem)がダウンロード出来ます。
client_keyのダウンロード
Account Management画面でPassword and Keyのタブを選択して、 Get a New Keyを選択するとpemファイル(ユーザ名.pem)がダウンロード出来ます。
WORKSTATIONでの作業
Starter Kitのダウンロード
CookBookのアプロードやRoleの作成などをWorkStationとして実施するための環境を整えるためにStarter Kitをダウンロードします。 左側のメニューに有るStarter Kitを選択するとダウンロード出来ます。 settings ディレクトリを作成して、kinife.rbとvalidation_key、client_keyを移動します。
これらを実行すると以下の様な構成になります。
.
├── README.md
├── settings
│   ├── Organazation名-validator.pem
│   ├── ユーザ名.pem
│   └── knife.rb
├── cookbooks
│   ├── chefignore
│   └── starter
│       ├── attributes
│       │   └── default.rb
│       ├── files
│       │   └── default
│       │       └── sample.txt
│       ├── metadata.rb
│       ├── recipes
│       │   └── default.rb
│       └── templates
│           └── default
│               └── sample.erb
└── roles
    └── starter.rb
コミュニティCookBookの追加
この状態でsettingsディレクトリでkinife listコマンドを実行する以下のように表示されます。
$ knife client list

Organazation名-validator
chef-repoをgitの管理下にします。
chef-repo$ git init .
chef-repo/.git/

chef-repo$ git add .
chef-repo$ git commit -m "Initial commit"
 11 files changed, 230 insertions(+)
 create mode 100644 README.md
 create mode 100644 settings/Organazation名-validator.pem
 create mode 100644 settings/ユーザ名.pem
 create mode 100644 settings/knife.rb
 create mode 100644 cookbooks/chefignore
 create mode 100644 cookbooks/starter/attributes/default.rb
 create mode 100644 cookbooks/starter/files/default/sample.txt
 create mode 100644 cookbooks/starter/metadata.rb
 create mode 100644 cookbooks/starter/recipes/default.rb
 create mode 100644 cookbooks/starter/templates/default/sample.erb
 create mode 100644 roles/starter.rb
コミュニティCookbookのgetting-startedを追加します。
chef-repo$cd settings
chef-repo/settings$ knife cookbook site install getting-started
  ...省略...
Cookbook getting-started version 0.4.0 successfully installed
Cookbookのアップロード
Cookbookをアップロードします。
chef-repo/settings$ knife cookbook upload --all
ERROR: Chef::Exceptions::MetadataNotValid: Cookbook loaded at path(s) [/home/clavier/Dev/chef/chef-repo/cookbooks/getting-started] has invalid metadata: The `name' attribute is required in cookbook metadata
meatadata.rbやmetadata.jsonにnameの項目がないので、以下の内容を追加します。
chef-repo/settings$ vim ../cookbooks/getting-started/metadata.rb

name 'getting-started'
再度、Cookbookをアップロードします。
chef-repo/settings$ knife cookbook upload --all
Uploading getting-started [0.4.0]
Uploading starter      [1.0.0]
Uploaded all cookbooks.
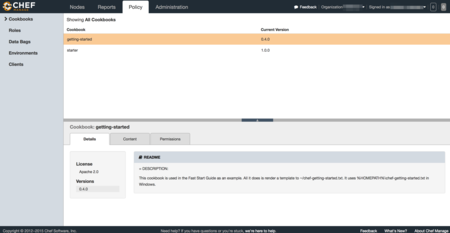
アップロードが完了したCookbookは Policy -> Cookbooks を選択することで確認出来ます。

TerraformをDigital Oceanで試してみる2 環境情報の外出し
前回では、do.tfファイルの中に全ての情報を書き込みました。
それではtoken情報やssh keyの値などはgitなどで管理しづらいので、ssh_keysとtokenを別のファイルで管理します。
ファイルを外出しするようになると、以下の様な構成になります。
.
├── do.tf
├── terraform.tfvars
└── variables.tf
この構成になるとterraform.tfvarsにtoken情報やssh keyの値を書くことで、このファイルのみをコミット対象外するとこでgitなどで問題無く扱えるようになります。
variables.tf
terraform.tfvarsで宣言する変数を宣言するためのファイルです。
do.tfの中で宣言しても、問題無いですが別ファイルで管理します。ファイルの内容はInput Variablesにあるように、書いていきます。
variable digitalocean_token {}
variable ssh_key_id {}
terraform.tfvars
このファイルでは、変数と値を定義します。
terraform.tfvarsファイルという名前にしておくと、上記のような構成にしておくと-var-fileオプションを付けなくても自動的にTerraformが読み込んでくれます。
dgitalocean_token = "前回作成したtoken"
ssh_key_id = "512189"
do.tf
前回作成したdo.tfのtokenとssh_keysの値を、variables.tfで定義した変数に書き換えます。
provider "digitalocean" {
      token = "${var.digitalocean_token}"
}

resource "digitalocean_droplet" "node-1" {
     image = "ubuntu-14-04-x64"
     name = "node-1"
     region = "sgp1"
     size = "512mb"
     ssh_keys = [${var.ssh_key_id}]
 }
これで、terraform plan や terraform applyの引数は変更なく実行出来ます。
TerraformをDigital Oceanで試してみる1
Digital Oceanの情報取得
Terraform を Digital Ocean で触ってみた (初級編) を参考にDigital Ocean のtokenを作成します。
Degital OceanのAPI V2を利用して、curlからSSH鍵の情報を取得します。
参考:https://developers.digitalocean.com/documentation/v2/#ssh-keys
# curl -X GET -H 'Content-Type: application/json' -H 'Authorization: Bearer 先ほど作成したtokenを記載' "https://api.digitalocean.com/v2/account/keys"

{
  "ssh_keys": [
    {
      "id": 512189,
      "fingerprint": "3b:16:bf:e4:8b:00:8b:b8:59:8c:a9:d3:f0:19:45:fa",
      "public_key": "ssh-rsa AAAAB3NzaC1yc2EAAAADAQABAAAAQQDDHr/jh2Jy4yALcK4JyWbVkPRaWmhck3IgCoeOO3z1e2dBowLh64QAM+Qb72pxekALga2oi4GvT+TlWNhzPH4V example",
      "name": "My SSH Public Key"
    }
  ],
  "links": {
  },
  "meta": {
    "total": 1
  }
}
ここで返ってきたidとDegital Oceanのtokenを次で作成する.tfファイルで利用します。
.tfファイルの作成
terraformでは、.tfファイルを作成しそこから環境を作成出来ます。
ここで、今まで行った作業を元にDegital Ocean用のdo.tfファイルを作成してみます。
provider "digitalocean" {
      token = "作成したtokenを記載"
}

resource "digitalocean_droplet" "node-1" {
     image = "ubuntu-14-04-x64"
     name = "node-1"
     region = "sgp1"
     size = "512mb"
     ssh_keys = [512189]
 }
dropletの作成
do.tfを利用して、dropletを作成します。 planのみでは実際にdropletは作成されず、applyまで実行することでdropletが作成されます。
$ terraform plan
Refreshing Terraform state prior to plan...


The Terraform execution plan has been generated and is shown below.
Resources are shown in alphabetical order for quick scanning. Green resources
will be created (or destroyed and then created if an existing resource
exists), yellow resources are being changed in-place, and red resources
will be destroyed.

Note: You didn't specify an "-out" parameter to save this plan, so when
"apply" is called, Terraform can't guarantee this is what will execute.

+ digitalocean_droplet.node-1
    image:                "" => "ubuntu-14-04-x64"
    ipv4_address:         "" => "<computed>"
    ipv4_address_private: "" => "<computed>"
    ipv6_address:         "" => "<computed>"
    ipv6_address_private: "" => "<computed>"
    locked:               "" => "<computed>"
    name:                 "" => "node-1"
    region:               "" => "sgp1"
    size:                 "" => "512mb"
    ssh_keys.#:           "" => "1"
    ssh_keys.0:           "" => "512189"
    status:               "" => "<computed>"

$ terraform apply
digitalocean_droplet.node-1: Creating...
  image:                "" => "ubuntu-14-04-x64"
  ipv4_address:         "" => "<computed>"
  ipv4_address_private: "" => "<computed>"
  ipv6_address:         "" => "<computed>"
  ipv6_address_private: "" => "<computed>"
  locked:               "" => "<computed>"
  name:                 "" => "node-1"
  region:               "" => "sgp1"
  size:                 "" => "512mb"
  ssh_keys.#:           "" => "1"
  ssh_keys.0:           "" => "512189"
  status:               "" => "<computed>"
digitalocean_droplet.node-1: Creation complete
status: "" => "
dropletにログイン
作成したdropletの情報を確認してログインします。
$ terraform show
digitalocean_droplet.node-1:
  id = 5556133
  image = ubuntu-14-04-x64
  ipv4_address = 128.199.64.45
  locked = false
  name = node-1
  region = sgp1
  size = 512mb
  ssh_keys.# = 1
  ssh_keys.0 = 512189
  status = active
IPアドレスがわかったので、実際にログインしてみます。
秘密鍵は~/.ssh/id_rsaにあるものとしています。
ssh -i ~/.ssh/id_rsa root@128.199.64.45
dropletの破棄
作成したdropletを破棄します。
$ terraform destroy
Do you really want to destroy?
  Terraform will delete all your managed infrastructure.
  There is no undo. Only 'yes' will be accepted to confirm.

  Enter a value: yes

digitalocean_droplet.node-1: Refreshing state... (ID: 5556133)
digitalocean_droplet.node-1: Destroying...
digitalocean_droplet.node-1: Destruction complete

Apply complete! Resources: 0 added, 0 changed, 1 destroyed.
gorillaでAPIサーバを書く 1
gorillaを使ってAPIサーバを書く。
ディレクトリ構成としては、以下を想定。
.api
 │
 ├── handlers
 │   ├── core.go
 │   └── router.go
 └── api.go
それぞれのファイルは大まかに以下のような役割になります。
- api.goはサーバの起動設定などを記載
- router.goはファイル名の通りrouterなので、パスに合わせたハンドラの設定
- core.goはハンドラーの実装
まずは必要なパッケージのインストール
go get github.com/gorilla/mux
api.goはgorilla特有の処理などは書かないので割愛。
router.go では、mux.Routerを使ったRouter関数を定義します。 エンドポイントを指定して、エンドポイントごとにHTTPメソッドに対応するHandler関数を設定します。
package handlers

import (
    "net/http"
    "github.com/gorilla/mux"
)

const (
    RegexMatchUserID = "[A-Za-z0-9]{3}"
)

func Router() *mux.Router {
    r := mux.NewRouter()

    s := r.PathPrefix("/api/").
        Subrouter().StrictSlash(false)

    usersPath := "/users/"
    subpath := usersPath + "{userId:" + RegexMatchUserID + "}"

    s.HandleFunc(usersPath, GetUsers).Methods("GET")

    s.HandleFunc(subpath, GetUserById).Methods("GET")

    s.HandleFunc(subpath, DeleteUserById).Methods("DELETE")

    s.HandleFunc(subpath, CreateUser).Methods("POST").
        Headers("Content-Type", "application/json")
    return r
}
PathPrefixでベースとなるURLを元にエンドポイントを組み立て行く方法の他に、下記のようにPathとPathPrefixを組み合わて同じように書くことが出来ます。
func Router() *mux.Router {
    r := mux.NewRouter()

    userPath := urlbase + "/users/"
    users := r.Path(userPath).Subrouter()

    users.Methods("GET").HandlerFunc(GetUsers)

    subpath := userPath + "{userId:" + RegexMatchUserID + "}"
    usr := r.PathPrefix(subpath).Subrouter()
    usr.Methods("GET").HandlerFunc(GetUserById)
    usr.Methods("DELETE").HandlerFunc(DeleteUserById)

    usr.Methods("POST").HandlerFunc(CreateUser)

    return r
}
Handlerメソッドについては、次回記載します。