パーフェクトRuby写経 特異メソッドの作り方
特異メソッドとは、クラスに定義されたメソッドの他に、そのオブジェクト固有のメソッド持つことができ、それを特異メソッドといいます。
特異メソッドを定義するには、メソッドを定義したいオブジェクトをメソッド名の前に指定してメソッドを記述します。 また、特異メソッドの中でsuperを呼び出すと、クラスに定義されている同名のメソッドが呼び出されます。
class Foo
    def override_me
        p 'in Foo class'
    end

end

foo = Foo.new
bar = Foo.new

def bar.singleton_method
    p 'Called!'
end

def bar.override_me
    p 'in Foo class'
end

bar.singleton_method
bar.override_me
モジュールに定義されたメソッドを、オブジェクトの特異メソッドとして取り込む。 そのさいには、extendを用います。
module Sweet
    def self.lot
        %w(brownie apple-pie bavarois pudding).sample
    end

    def greet_to(name)
        p "Hello, #{name}. My name is #{self.class}"
    end
end

o = Object.new
o.extend Sweet

o.greet_to 'world'
#o.lot

p Sweet.lot
また、self.lotのようにモジュールのメソッド名の前にselfをつけて定義すると、モジュールの特異メソッドとなります。
また、モジュール関数は「privateなインスタンスメソッドであると同時に、モジュールの特異メソッドでもある」メソッドとの事なので、これも特異メソッドの一種のようです。
module MyFunctions
    def my_module_func
        p 'Called!'
    end
    module_function :my_module_func
end
一つのメソッドの場合は上記のように記述し、複数のメソッドを定義さする場合には下記のように記述するようです。
module MyFunctions
    module_function

    def my_first_func
        p 'first!'
    end

    def my_second_func
        p 'second!'
    end

end
chefdashを試す
chefdash by sidebolt を試してみます。 chefdashはchef-clientのノードの登録や、environment毎やserver毎にcookbookを実行するWebUIを提供するWebアプリケーションです。
必要なものを事前にインストールしておきます。
sudo apt-get install git git-core
sudo apt-get install libssl-dev
sudo ./install.sh
sudo -i -u chefdash
あとはソースコードを取得し、chefdash by sidebolt のRedmeに書いてある手順で実行します。
注意点
chefdashユーザでknifeコマンドを実行できるようにしておく必要があるため、knife configure --initialを実行します。
knife bootstrap用の設定
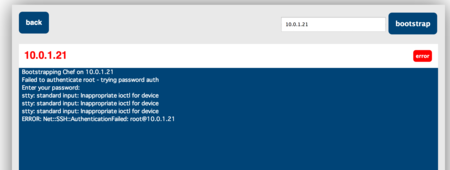
chefdashでは、それぞれのchef-clientノードにknife bootstrapコマンドを利用してchef-clientのインストール・設定を行うことが可能です。 chefdashで利用しているknife bootstrapのオプションは--sudoです。 特に何も設定しないで、実行すると下記のようなエラーがでます。

このようなエラーが出ますので、事前にrootにパスワードなしでログインできるようになっている必要があります。
chefdashサーバから、chef-clientをインストールするノードにパスワード無しでログインできるようにする必要があります。
chefdashサーバからroot ユーザの環境にSSH の公開鍵と秘密鍵をコピーします。
$ scp .ssh/id_rsa root@chef-clientノードのIPアドレス:/root/.ssh
$ scp .ssh/id_rsa.pub  root@chef-clientノードのIPアドレス:/root/.ssh
chef-clientをインストールされる側のノードでは以下の設定をします。
$ sudo chown root. /root/.ssh/id_rsa
$ sudo chown root. /root/.ssh/id_rsa.pub
$ sudo cat /root/.ssh/id_rsa.pub | sudo tee -a /root/.ssh/authorized_keys
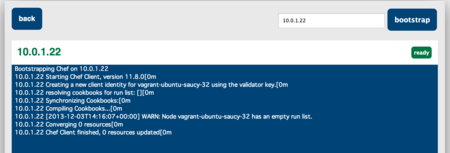
これで、chefdashがknife bootstrapを正常に実行出来るようになります。

chef-clientの実行
chef-clientを実行する前に、ノードでcookbookを実行するようにrun-listを登録しておく必要があります。 chefdashが実際にchef-clientコマンドを実行してCookBookを実行するときは、sshでchef-clientノードに入ってchef-clientコマンドを実行しています。 chefdashが実行しているコマンドは、下記のコマンドです
ssh -o StrictHostKeyChecking=no chef-clientのIPアドレス sudo chef-client
上記のコマンドがパスワードの問い合わせなど発生せずに実行出来る必要があります。 そのためにchefdashユーザがsshでログインできるように各マシンに SSH の公開鍵と秘密鍵をコピーしておく必要があります。
$ scp .ssh/id_rsa root@chef-clientノードのIPアドレス:/home/ubuntu/.ssh
$ scp .ssh/id_rsa.pub root@chef-clientノードのIPアドレス:/home/ubuntu/.ssh
$ sudo chown ubuntu. /home/ubuntu/.ssh/id_rsa
$ sudo chown ubuntu. /home/ubuntu/.ssh/id_rsa.pub
$ sudo cat /home/ubuntu/.ssh/id_rsa.pub | sudo tee -a /home/ubuntu/.ssh/authorized_keys
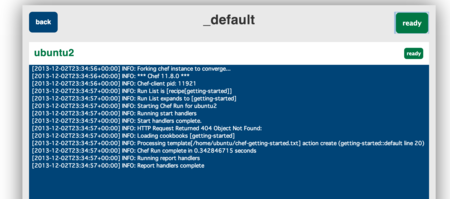
また、chef-clientノードで、chef-clientコマンドをsudo実行できるように、visudoなどで設定しておく必要があります。 cookbookの実行が成功すると、下記のように表示されます。

雑感
最初はchef-zeroと組み合わせて利用できたら面白いかと思って触ってみが、認証が必要ということであえなく挫折。
chef-serverと組み合わせて確認することになりました。
chef-clientやkinife bootstrapの実行ログ(標準出力に出力される内容)をwebsocketで画面に描画したり、そのあたりの実行結果もwebsocketでやりとりをするという仕組みは面白いと感じました。
複数のサーバに対してcookbookを頻繁に実行するような環境を持っているなら構築する価値はあるかもという感じでした。反面構築時に1回だけ実施するような利用の仕方だと、それほど魅力的はないかと思いました。

VagrantのCentOS 6.4にChef-Serverをインストールしようとはまった
sudo chef-server-ctl reconfigureを実行しようとしたら、次のようなエラーが出た。
Expected process to exit with [0], but received '22'
---- Begin output of curl -sf http://127.0.0.1:8000/_status ----
STDOUT:
STDERR:
---- End output of curl -sf http://127.0.0.1:8000/_status ----
Ran curl -sf http://127.0.0.1:8000/_status returned 22


Resource Declaration:
---------------------
# In /opt/chef-server/embedded/cookbooks/chef-server/recipes/bootstrap.rb

 24: execute "verify-system-status" do
 25:   command "curl -sf #{erchef_status_url}"
 26:   retries 20
 27:   not_if { File.exists?(bootstrap_status_file) }
 28: end
 29:


Compiled Resource:
------------------
# Declared in /opt/chef-server/embedded/cookbooks/chef-server/recipes/bootstrap.rb:24:in `from_file'

execute("verify-system-status") do
  action "run"
  retries 0
  retry_delay 2
  command "curl -sf http://127.0.0.1:8000/_status"
  backup 5
  returns 0
  cookbook_name :"chef-server"
  recipe_name "bootstrap"
  not_if { #code block }
end


[2013-11-29T14:18:42+00:00] ERROR: Running exception handlers
[2013-11-29T14:18:42+00:00] ERROR: Exception handlers complete
Chef Client failed. 9 resources updated
[2013-11-29T14:18:42+00:00] FATAL: Stacktrace dumped to /opt/chef-server/embedded/cookbooks/cache/chef-stacktrace.out
[2013-11-29T14:18:42+00:00] FATAL: Mixlib::ShellOut::ShellCommandFailed: execute[verify-system-status] (chef-server::bootstrap line 24) had an error: Mixlib::ShellOut::ShellCommandFailed: Expected process to exit with [0], but received '22'
---- Begin output of curl -sf http://127.0.0.1:8000/_status ----
STDOUT:
STDERR:
---- End output of curl -sf http://127.0.0.1:8000/_status ----
Ran curl -sf http://127.0.0.1:8000/_status returned 22
chef - [chef] Re: Re: Re: Re: Re: Re: Chef v11 fails on Centos 6.4
に全く同じ事象があったのですが、/etc/hostsでホスト名を解決できるようにするとエラーは出なくなります。
また、Vagrantのboxにはある程度(1G以上?)メモリを割り当てないとWebUIにアクセスしたときにnginxが502 Bad Gatewayが出たりするので、reconfigureが正常に終了してもWebUIにアクセスすると502 Bad Gatewayが出るようならメモリ割り当てのサイズを大きくしてみると良いかもしれません。
CentOSにchef-zeroのインストール
chef-zeroとは
chef-zero とは、Chef 11 Server 同等の REST API インターフェースを備えた軽量で簡易な Chef Server です。認証やデータの永続的な保存などを行わない代わりに導入が大変簡単で、Chef Clientなどのテストに有用です。 とのこと。
chef-zeroのインストール
chef-zeroが依存するGemにはRuby拡張をビルドするものがあるため、Development Toolsパッケージグループとruby-develパッケージ、openssl-develパッケージをインストールしておきます。
$ sudo yum groupinstall "Development Tools"
$ sudo yum install ruby-devel openssl-devel
gemが入っていない場合にはインストールします。
$ yum install rubygems
$ ruby -v
ruby 1.8.7 (2011-06-30 patchlevel 352) [x86_64-linux]
chef-zeroのインストールを行います。
$ sudo gem install chef-zero json --no-ri --no-rdoc
Building native extensions.  This could take a while...
Successfully installed mixlib-log-1.6.0
Successfully installed hashie-2.0.5
Successfully installed moneta-0.6.0
Successfully installed json-1.8.1
Successfully installed rack-1.5.2
Successfully installed chef-zero-1.7.2
Building native extensions.  This could take a while...
Successfully installed json-1.8.1
7 gems installed
chef-zero を実行します。 とりあえず、全てのサーバから接続を受け付けるようにして起動してみます。
$ chef-zero -H 0.0.0.0 &
[2] 2777
[vagrant@vagrant-centos64 ~]$ >> Starting Chef Zero (v1.7.2)...
>> WEBrick (v1.3.1) on Rack (v1.5) is listening at http://0.0.0.0:8889
>> Press CTRL+C to stop
workstationの設定
今回はworkstationとchef-clientは同一ホストにするので、引き続きchefクライアントのインストールを行います。
$ curl -L https://www.opscode.com/chef/install.sh | bash
つづいて、knifeコマンドを使えるようにしてみます。
$  mkdir /home/vagrant/.chef/
$ vim /home/vagrant/.chef/knife.rb
knife.rbの設定は次のようになります。 client_keyは適当なClientキーを指定し、node_nameも適当に指定します。 client_keyは読み込み可能なprivate key であれば何でも良いです。
log_level               :info
log_location            STDOUT
node_name               'ubuntu1'
client_key              '/opt/chef/embedded/lib/ruby/gems/1.9.1/gems/chef-11.8.0/spec/data/ssl/private_key.pem'
chef_server_url         'http://10.0.1.9:8889'
動作確認のため利用するレシピはOPSCODEのgetting-startedです。
このレシピはホームディレクトリに、chef-getting-started.txt を作成するレシピです。
レシピをChef Serverにアップロードします。
$ git clone https://github.com/opscode-cookbooks/getting-started.git
$ knife cookbook upload getting-started -o .
管理対象ノード(chef-client)の設定
chef-clientとして実行するには、client.rbが必要なので/etc/chef/client.rbの内容を編集します。 今回は、workstationと同じホストで試しているためnode_nameが同じになっています。 client_keyとvalidation_key は読み込み可能なprivate key であれば何でも良いです。
log_level               :info
log_location            STDOUT
node_name               'ubuntu1'
client_key              '/opt/chef/embedded/lib/ruby/gems/1.9.1/gems/chef-11.8.0/spec/data/ssl/private_key.pem'
validation_key          '/opt/chef/embedded/lib/ruby/gems/1.9.1/gems/chef-11.8.0/spec/data/ssl/private_key.pem'
chef_server_url         'http://10.0.1.9:8889'
これでchef-clientを実行すると、chef-zeroサーバにノードが登録されます。
$ sudo chef-client
[2013-11-25T23:17:00+00:00] INFO: Forking chef instance to converge...
Starting Chef Client, version 11.8.0
[2013-11-25T23:17:00+00:00] INFO: *** Chef 11.8.0 ***
[2013-11-25T23:17:00+00:00] INFO: Chef-client pid: 3811
[2013-11-25T23:17:00+00:00] INFO: Run List is []
[2013-11-25T23:17:00+00:00] INFO: Run List expands to []
[2013-11-25T23:17:00+00:00] INFO: Starting Chef Run for ubuntu1
[2013-11-25T23:17:00+00:00] INFO: Running start handlers
[2013-11-25T23:17:00+00:00] INFO: Start handlers complete.
[2013-11-25T23:17:00+00:00] INFO: HTTP Request Returned 404 Not Found : Object not found: /reports/nodes/ubuntu1/runs
resolving cookbooks for run list: []
[2013-11-25T23:17:00+00:00] INFO: Loading cookbooks []
Synchronizing Cookbooks:
Compiling Cookbooks...
[2013-11-25T23:17:00+00:00] WARN: Node ubuntu1 has an empty run list.
Converging 0 resources
[2013-11-25T23:17:00+00:00] INFO: Chef Run complete in 0.060747315 seconds
[2013-11-25T23:17:00+00:00] INFO: Running report handlers
[2013-11-25T23:17:00+00:00] INFO: Report handlers complete
Chef Client finished, 0 resources updated

$ knife node list
ubuntu1
引き続きノードにrecipeを追加します。
$knife node run_list add ubuntu1 "recipe[getting-started]"
最後にchef-clientを実行します。
$ sudo chef-client
[2013-11-26T13:18:22+00:00] INFO: Forking chef instance to converge...
Starting Chef Client, version 11.8.0
[2013-11-26T13:18:22+00:00] INFO: *** Chef 11.8.0 ***
[2013-11-26T13:18:22+00:00] INFO: Chef-client pid: 4521
[2013-11-26T13:18:22+00:00] INFO: Run List is [recipe[getting-started]]
[2013-11-26T13:18:22+00:00] INFO: Run List expands to [getting-started]
[2013-11-26T13:18:22+00:00] INFO: Starting Chef Run for ubuntu1
[2013-11-26T13:18:22+00:00] INFO: Running start handlers
[2013-11-26T13:18:22+00:00] INFO: Start handlers complete.
[2013-11-26T13:18:22+00:00] INFO: HTTP Request Returned 404 Not Found : Object not found: /reports/nodes/ubuntu1/runs
resolving cookbooks for run list: ["getting-started"]
[2013-11-26T13:18:22+00:00] INFO: Loading cookbooks [getting-started]
Synchronizing Cookbooks:
[2013-11-26T13:18:22+00:00] INFO: Storing updated cookbooks/getting-started/recipes/default.rb in the cache.
[2013-11-26T13:18:22+00:00] INFO: Storing updated cookbooks/getting-started/attributes/default.rb in the cache.
[2013-11-26T13:18:22+00:00] INFO: Storing updated cookbooks/getting-started/metadata.rb in the cache.
[2013-11-26T13:18:22+00:00] INFO: Storing updated cookbooks/getting-started/README.md in the cache.
  - getting-started
Compiling Cookbooks...
Converging 1 resources
Recipe: getting-started::default
  * template[/home/vagrant/chef-getting-started.txt] action create[2013-11-26T13:18:22+00:00] INFO: Processing template[/home/vagrant/chef-getting-started.txt] action create (getting-started::default line 20)
[2013-11-26T13:18:22+00:00] INFO: template[/home/vagrant/chef-getting-started.txt] created file /home/vagrant/chef-getting-started.txt

    - create new file /home/vagrant/chef-getting-started.txt[2013-11-26T13:18:22+00:00] INFO: template[/home/vagrant/chef-getting-started.txt] updated file contents /home/vagrant/chef-getting-started.txt

    - update content in file /home/vagrant/chef-getting-started.txt from none to e84a13
        --- /home/vagrant/chef-getting-started.txt      2013-11-26 13:18:22.966299400 +0000
        +++ /tmp/chef-rendered-template20131126-4521-17p6nv5    2013-11-26 13:18:22.966299400 +0000
        @@ -1 +1,6 @@
        +Welcome to Chef!
        +
        +This is Chef version 11.8.0.
        +Running on ubuntu.
        +Version 13.04.[2013-11-26T13:18:22+00:00] INFO: template[/home/vagrant/chef-getting-started.txt] mode changed to 644

    - change mode from '' to '0644'

[2013-11-26T13:18:23+00:00] INFO: Chef Run complete in 0.162571175 seconds
[2013-11-26T13:18:23+00:00] INFO: Running report handlers
[2013-11-26T13:18:23+00:00] INFO: Report handlers complete
Chef Client finished, 1 resources updated
雑感
validation_keyのコピーなどが発生しないため比較的簡単に使えるようになりますが、結局server、workstation、clientの構成は必要になるのでchef-soloと比べると手軽さは非常に落ちます。 ただし、Chef 11 Server 同等の REST API インターフェースを備えているということなので、そのあたりに価値を見いだせればお試しとして使ってみるのは良いかもしれません。
ChefのCookBookで、virtualenvを使えるようにする
poise/python · GitHub を使ってPython環境を作ると、自作のCookBookでpipやvirtualenvが使えるようになります。
poise/python · GitHub で は、Pythonのインストール、pipのインストール、virtualenvのインストールを行います。
インストールする場合はbuild-essentialが必要になります。
また、Redhat系の環境にパッケージでインストールするの場合はyumも必要になります。
インストール方法
recipesのdefault.rbを見ると、他のrecipeをincludeしているので、特に何も指定しなくてもpythonのインストール、pipのインストール、virtualenvのインストールが実行されることがわかります。
include_recipe "python::#{node['python']['install_method']}"
include_recipe "python::pip"
include_recipe "python::virtualenv"
パッケージインストールの場合は、run_listにpythonを追加するだけです。 chef-soloだったら、/tmp/vagrant-chef-1/dna.jsonなどに設定。
{
  "run_list" : [
    "recipe[python]"
  ]
}
ソースコードからインストールする場合には、environmentなどに、install_methodとversionを指定します(他にもcheck_sumなども指定できます)。 以下はchef-soloでの設定例です。
{
  "python" : {
    "install_method" : "source",
    "version" : "2.7.5"
  },
  "run_list": [
    "recipe[python]"
  ]
}
ソースコードからインストールする場合には、versionはソースコードを取得する先もある程度指定できます。
remote_file "#{Chef::Config[:file_cache_path]}/Python-#{version}.tar.bz2" do
  source "#{node['python']['url']}/#{version}/Python-#{version}.tar.bz2"
  checksum node['python']['checksum']
  mode "0644"
  not_if { ::File.exists?(install_path) }
end
recipes/source.rb を確認するとわかりますが、拡張子(.tar.bz2)の部分が固定なので、tar.bz2が無い場合にはエラーになってしまうので注意が必要です。
2.7.6は拡張子(.tar.bz2)のものが無いので、現時点ではエラーになりました。
pipやvirtualenvの使い方
pipの使い方は、virtualenvのrecipeを見ればわかるかと思います。
python_pip "virtualenv" do
  action :install
end
virtualenvとpipを使ってFlaskをインストールには、次のようなレシピを作って実行すればOKです。
include_recipe "python::pip"
include_recipe "python::virtualenv"

python_virtualenv "/home/vagrant/apps" do
  action :create
  owner "vagrant"
  group "vagrant"
end

python_pip "Flask" do
  action :install
  virtualenv "/home/vagrant/apps"
end
確認してみると、インストールされていることがわかります。
vagrant@vagrant-ubuntu:~$source ./apps/bin/activate
(apps)vagrant@vagrant-ubuntu:~$ pip list
argparse (1.2.1)
Flask (0.10.1)
itsdangerous (0.23)
Jinja2 (2.7.1)
MarkupSafe (0.18)
pip (1.4.1)
setuptools (0.9.8)
Werkzeug (0.9.4)
wsgiref (0.1.2)